Virtual Eye
About Virtual Eye
Screen shots
Techniques and algorithms
Features
Download
Developers
Contact
About Virtual Eye
Virtual Eye is an Open Source GNU GPL software by Omid Rouhani.
The program has been written during a project course at
Chalmers University of Technology.
The project course was about creating an autonomous car
that could follow a path made by tape on the floor.
The project was called
MiniCar II.
Virtual Eye is a program that takes as input an image and outputs an angle that tells the car how to drive.
The program is written both in Java and C++.
Minor differences exist in the Java and the C++-version
of the program. For example, while Java has many built in functions
that can be used, these functions have been written from scratch in C++.
The C++-program contains no GUI what so ever,
whilst the Java version contains a GUI and is preferred for debugging.
All screen shots are taken from the Java version.
Screen shots
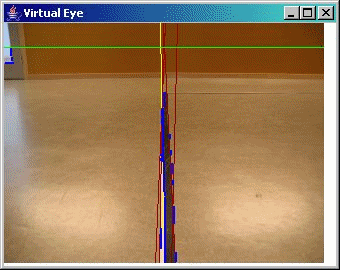
A demo of Virtual Eye
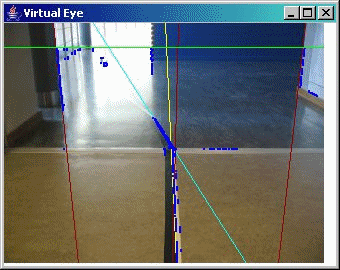
Some sample screen shots
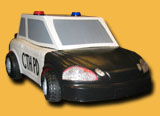
MiniCar II - The car that Virtual Eye shall control
Techniques and algorithms
The program consists of approximately 12'000 lines of code.
To write a short A4 about exactly what the program does including all details
is not at all possible.
Here I have tried to explain how the program works and what it does.
I have tried to write the text so that both people not involved
in image analysis and experts in the field of image
analysis shall be able to read and understand what I have done.
Keep in mind that this program has been written to be used in a real time system and has high requirements when it comes to performance. It is not ok if the car crashes into the wall once a while, and it's not ok if the image analysis takes to long time so that the car misses curves (due to that too long time has elapsed from that the picture was take to the moment the car takes action).
Of course, many features and algorithms have been
removed during the development of the program, since
better algorithms have been developed or because some operations
might have been to time consuming.
These features that have been removed are not presented here.
However, some of these features can be found in the source
as code that is no longer in use.
- Get the image
- Image pre-processing
- If the image is an RGB24 picture, convert it to a grayscale image.
- Use the Laplacian filter on the Image in the spatial domain. In short: The Laplacian operator gives us the derivative of the picture in the spatial domain. That is all changes in the picture from one pixel to another.
- Now go through the entire image and store all the strongest pixel values in a data structure that will allow us to insert and remove points with O(1), and that still will be able to give us the strongest pixel values first. (Note that this is a sorted data structure with a constant time complexity for both insert and remove). This allows us to choose exactly how many points given from the Laplacian we want to use during the program execution, since all points are sorted and stored in this data structure.
- By using the knowledge that we have a black and white tape, we can remove additional points that the Laplacian gave us. But aware! With a bad resolution and a dark room the tape can easily be black and gray instead of black and white.
- The Hough transform
-
For all points that we have picked out from the Laplacian operator,
we now create approximately one thousand lines that goes through each point
in all possible directions.
We store the lines by their r and theta values. The r and theta-values are
equivalent to the k and m value that uniquely represents a line according
to the formula y = k * x + m.
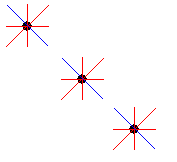
Example Hough transform:
Assume that you have 3 points and that you for each point create 4 lines. You totally have 12 lines (red and blue) and you can see that if you write the equations for all lines, then you will have 3 equations that are the same. These 3 equations correspond to the 3 blue lines in the picture.
Now we can assume that this equation that was written down 3 times actually is a line in the picture.Virtual Eye works the same way but has approximately 1000 points and creates approximately 1000 lines through each point.
-
For all points that we have picked out from the Laplacian operator,
we now create approximately one thousand lines that goes through each point
in all possible directions.
We store the lines by their r and theta values. The r and theta-values are
equivalent to the k and m value that uniquely represents a line according
to the formula y = k * x + m.
- Finding the lines
- Now we have almost one million equations (each equation corresponds to one line). We loop through all these equations and pick out a few of them that we shall investigate further.
- We now add as many lines as we want to a data structure that store lines. This data structure automatically keeps track of which lines that we add are too similar to lines that we have already added previously and hence ignores these lines.
- When we have enough with lines in the data structure we throw away all other lines. However, the problem is now that we have a lot of equations for our lines, but where does a line start and end? We must know this!
- Now we start with looping through all points that we have. Each point must be investigated together with each line. Is this point at all related to this line? Is it maybe one of the two ending points that each line must have? (A line starts and stops somewhere.) If the point lies close to the line we say that it belongs to that line, but if the point is far away from the line we say that the point does not belong to that point.
- Now we sort all points that belong to a line and we can see where the line starts and ends.
- However, we have too much noise in our picture to use this method just like this. Instead we start looking for partitions among the points that belong to a certain line. Take a line L and partition the points that belong to L in two subgroups G1 and G2 such that for each point in G1, it's far away from all points in G2, and vice verse. If we have groups G1 and G2 like this, we remove the smallest group. That is, if group G2 only consist of some noisy points at the top of the image and that G1 consist of correct points that belongs to the line, we will remove G2 and the line now only consists of G1 - only good points. We do this recursively in case G1 would consist of more noisy points.
- Now we have a few lines and we know where each line starts and stops.
- We start looking for a line that starts close to the camera. This line is probably the line we shall follow, so let's follow it.
- However, we also know where this line ends. We check the area close to this ending point: does it exists some new line that starts from here? If yes it must be a turn to the left or right.
- We now have the equations for both the line that is in front of us, and the line that changes direction and that we shall turn towards. We also know where all the lines start and stop in the picture.
- Controlling the car
- Given the two lines above we look at:
* The angle of the lines
* The direction of the lines.
* Where the second line starts. - With this information, and some implicit constants for the speed of the car, how fast the car can turn, the time of execution for one image analysis, the angle on the camera, the height above the ground that the camera is on etc. we can choose how the car shall drive.
- Given the two lines above we look at:
Features
A very short list of features that Virtual Eye has:
- 26 parameters (!) that can be used to calibrate the image analysis part of Virtual Eye.
All parameters are well documented with information
about how changes to the parameter will change the overall
program performance.
Some parameters are of the type "increase the value of this parameter and get a better image analyse but with longer execution time".
Some parameters are of the type "increase the value of this parameter and make the program more accurate, but more sensitive to noise". - 4 additional parameters to adjust how the car shall drive depending on what line we want to follow.
- With a 1,3 GHz processor the run time is below 0,5 seconds per image that is analyzed.
Download
Download the source:
Download Virtual Eye Source
Developers
Virtual Eye has mainly been written by Omid Rouhani. Other contributors are:
- When this project started both Gustav Arngĺrden and Omid Rouhani together implemented a simple Hough transform in Java as a project for a course in image analysis given at our university. The code for this Hough transform has then been used when writing Virtual Eye.
- Kamio Suguru has written two functions used for reading and writing bmp-files to hard drive with C++.
-
Virtual Eye has been written to be used for a project called
MiniCar II
at Chalmers University of Technology.
All group members have made great contribution and together
done a fantastic job turning this car into a fully functional
car that satisfies all requirements that we have put up for the car.
The group members are:
Gustav Arngĺrden, Mansoor Chandhry, Magnus Gunnarsson, Mikael Engbom, Mirza Keserovic, Rickard Svenningsson and Omid Rouhani.
Contact
Feel free to send any comments and questions about Virtual Eye to Omid Rouhani. Contact information can be found at the bottom of this site.
Omid Rouhani is a 21 years old student at the
Chalmers University of Technology
in Sweden.
Copyright © Omid Rouhani 2003-2004; All rights reserved.
Contact Omid Rouhani: